Building the brick field is a little bit more complicated than adding a single objects to the screen. It's still easier with Phaser than doing that in pure JavaScript though. We will create a group of bricks and print them on screen in a loop. First, let's define the needed variables:
var bricks;
var newBrick;
var brickInfo;
The bricks variable will be used to create a group, newBrick a new object added to the group on every iteration of the loop and brickInfo will store all the data we need. Next, let's load the image of the brick:
function preload() {
    // ...
    game.load.image('brick', 'img/brick.png');
}
We will place all the code inside the initBricks function to keep it separated from the rest of the code. Add initBricks at the end of the create function:
function create(){
    // ...
    initBricks();
}
Write down the initBricks function's body at the end of our games's code, just before the closing </script> tag. Let's start with brickInfo - it will come in handy really quick:
function initBricks() {
    brickInfo = {
        width: 50,
        height: 20,
        count: {
            row: 3,
            col: 7
        },
        offset: {
            top: 50,
            left: 60
        },
        padding: 10
    }
}
This brickInfo object will hold all the information we need: width and height of the single brick, number of rows and columns of bricks we will see on screen, top and left starting point where we begin to print the bricks on screen and the padding between single bricks. Now, let's start creating the bricks themselves - add the empty group first:
bricks = game.add.group();
We can loop through the rows and columns to create new brick on every iteration:
for(c=0; c<brickInfo.count.col; c++) {
    for(r=0; r<brickInfo.count.row; r++) {
        // create new brick and add it to the group
    }
}
That way we will create the exact number of bricks we need and have them all in a group.
for(c=0; c<brickInfo.count.col; c++) {
    for(r=0; r<brickInfo.count.row; r++) {
        var brickX = 0;
        var brickY = 0;
        newBrick = game.add.sprite(brickX, brickY, 'brick');
        game.physics.enable(newBrick, Phaser.Physics.ARCADE);
        newBrick.body.immovable = true;
        newBrick.anchor.set(0.5);
        bricks.add(newBrick);
    }
}
We're looping through the rows and columns to create the new brick and place it on the screen - at coordinates (0,0) for now, but we will calculate the proper positions in a minute. The newly created brick is enabled for Arcade physics engine, it's body is set to be immovable (so it won't move when hit by the ball), we're also setting the anchor to be in the middle and adding the brick to the group.
The problem is that we're painting all bricks in one place, at coordinates (0,0). What we need to do is figure out a way to have x and y position of new brick in each loop iteration:
var brickX = (r*(brickInfo.width+brickInfo.padding))+brickInfo.offset.left;
var brickY = (c*(brickInfo.height+brickInfo.padding))+brickInfo.offset.top;
Each brickX position is worked out as brickInfo.width plus brickInfo.padding, multiplied by the row number, r, plus the brickInfo.offset.left; the logic for the brickY is identical except that it uses the values for column number, c, brickInfo.height, and brickInfo.offset.top. Now every single brick can be placed in its correct place row and column, with padding between each brick, drawn at an offset from the left and top Canvas edges.
Here is the complete code for the initBricks function:
function initBricks() {
    brickInfo = {
        width: 50,
        height: 20,
        count: {
            row: 3,
            col: 7
        },
        offset: {
            top: 50,
            left: 60
        },
        padding: 10
    }
    bricks = game.add.group();
    for(c=0; c<brickInfo.count.col; c++) {
        for(r=0; r<brickInfo.count.row; r++) {
            var brickX = (c*(brickInfo.width+brickInfo.padding))+brickInfo.offset.left;
            var brickY = (r*(brickInfo.height+brickInfo.padding))+brickInfo.offset.top;
            newBrick = game.add.sprite(brickX, brickY, 'brick');
            game.physics.enable(newBrick, Phaser.Physics.ARCADE);
            newBrick.body.immovable = true;
            newBrick.anchor.set(0.5);
            bricks.add(newBrick);
        }
    }
}
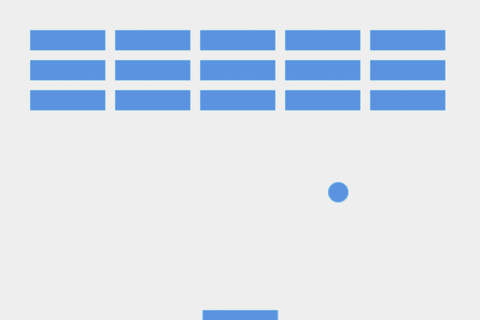
Everything works fine as expected - the bricks are printed on screen in an evenly distances from each other.
You can check the finished code for this lesson for yourself in the live demo below, and play with it to understand better how it works:
Something is missing though. The ball goes through the bricks without stopping - we need proper collision detection.